
Widest cross-browser compatibility
The html menus generated by Vista Buttons run perfectly on all old and new browsers, including IE5,6,7,8, Firefox, Opera, Safari and Chrome on PC, Mac, and Linux. Vista Buttons menus have a structure based on HTML list of links (LI and UL tags), readable by any search-engine robots and text browsers.
Dhtml Rollout Menu
Export graphic picture
Using Vista Buttons you can save menu graphic picture as gif-files (*.gif).
Javascript Vista Button
High Quality and Professional Results
You don't have to know HTML, JavaScript, CSS or any other coding languages to make multi-state rollover web buttons, professional cross-browser, search engine friendly DHTML menus. All you have to do is make some clicks and adjust buttons as you wish for them to appear. Vista Web Buttons will generate all necessary images, html, javascripts, css styles automatically!
Html Pulldown Navigation
Css Drop Down Menus
Create drop down menus based on css using Vista Buttons. Make various styles for each submenu item adjusting css styles.
HTML Word Wrap Pictures
Menu Template:
Flyout Menu Horizontal Blue Toolbar


 |  |  |  |  |
How To Change Windows Icon Font Color
This menu is generated by Javascript Menu Builder.
Create your own menu now!

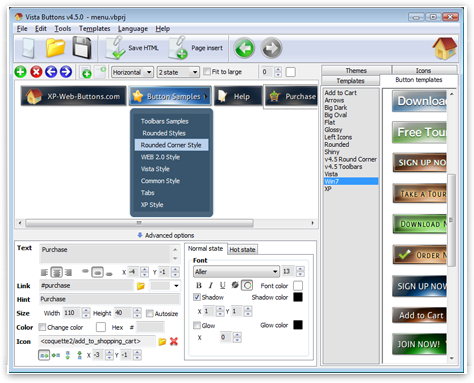
How To Change Windows Icon Font Color Screenshots


Menu, Button, and Icon Collection
Javascript Menu Builder provides huge collection of 1400 web buttons, 6600 icons, 300 ready-made samples, so you'll create really nice looking menus and buttons with little or no design skills at all! Web 2.0, Mac, iPhone, Aqua buttons, Vista, XP, transparent, round, glossy, metallic, 3d, tab menus, drop down menus will be a breeze!Button and Icon Samples


How to Use Javascript Menu Builder Menu Generator
Button Themes Toolbox
In the Themes toolbox you can choose selected buttons for web appearance. Click theme name to open it. The theme's available button backgrounds will appear in the Button backgrounds list.
You can check how a background responds to the mouse events without applying it. To do so just move mouse over/click the background.
To apply chosen background, just double-click it. Selected buttons' appearance will change.
- Double click on the one of the predefined buttons' and submenus templates to apply it to your menu When the submenu is larger than the visible area of the page the submenu will be automatically decreased. You can use scrollbar to see all submenu items Build menus completely based on Cascading Style Sheets. It is possible to appoint the individual CSS styles for separate elements of the menu.
Support
Please contact Customer Support at (please include template name in the message title)

FAQ
- "I can add as many levels as I want in the button generate program , but just one submenu button per level in the ..."
- ".. Is there a way to add images to the image collection of the button software? Vista Effects For Xp
- "..How can I set up Vista Buttons dreamweaver extension?"
- ".. How SEO friendly is the button maker software? "
- ".. However now I'm just wanting to edit the webpage menu itself."
- ".. How do I call my custom javaScript with clicked after i have the working HTML export for the go buttons."
How To Change Windows Icon Font Color Popular Templates


How To Change Windows Icon Font Color Recommended by:

How To Change Windows Icon Font Color Awards